Il superpotere della supercolla (e dei normali perni) – The superpower of superglue (and that of normal pins) – 强力胶的强力(以及一般栓的)


Come spesso accade in questo hobby,
il modello che rappresenta un eroe è frutto di una modifica più o meno
elaborata. In questo caso si tratta di una modifica relativamente semplice, ma
scriverò un paio di articoli su lavori molto più complessi e che richiedono la
scultura ex novo di alcuni elementi.
Tornando a noi, come mi è venuta in
mente l’idea per questa modifica? Sostanzialmente è nata dall’attenta
osservazione e dalla scarsità di denaro a mia disposizione, e purtroppo
quest’ultima è una caratteristica di tanti hobbisti. Un giorno stavo guardando
alcune immagini dell’alfiere dello stendardo da battaglia degli Uomini Lucertola
(ora Seraphon) e mi sono reso conto che due degli elementi che compongono lo
stendardo appartengono a due delle truppe di questo esercito: le guardie del
tempio (ora Saurus Guards) ed i cavalieri su naggaronte (ora Saurus Knights).
Per quanto mi piaccia davvero molto il modello dell’alfiere in finecast, il
problema sta proprio nel materiale con cui è fatto. In generale, la resina è
ottima per le miniature molto dettagliate, tuttavia non è un materiale molto
resistente e quindi è facile che i componenti più sottili o sporgenti si
possano rompere. In particolare mi sto riferendo sia alle varie decorazione che
pendono o sporgono dall’insegna, sia all’asta che la sorregge. Probabilmente si
potrebbe dare stabilità all’asta tagliandola all’altezza della mano dell’eroe,
praticare dei fori e mettere un perno abbastanza lungo a cui fissarla
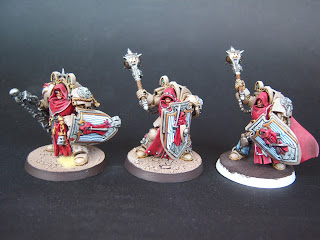
nuovamente. Io, però, ho seguito un’altra strada che mi ha portato al risultato
che vedete in foto.
Iniziamo dai pezzi che avevo a
disposizione: il corpo di un sauro, un braccio destro da alfiere, un braccio
sinistro, una mazza, i due stendardi dei sauri guerrieri, due stendardi uguali
dei cavalieri su naggaronte, l’asta di una lancia, la testa di un cavaliere su
naggaronte alpha ed alcune decorazioni.
Ho cominciato ad incollare al corpo
la testa, la gamba destra e le braccia con la colla per plastica. A questo
punto inizia la modifica vera e propria. Ho tagliato l’asta dello stendardo
all’altezza della mano ed ho separato la catenella decorativa dalla spalla. So
che può sembrare banale, ma questo unico elemento che sembra garrire al vento
mi dà una forte sensazione di movimento, come se il modello stesse davvero
caricando un avversario.
Una volta tagliata l’asta dello
stendardo, ho iniziato a fare i fori per i perni. Dato che il filo da 1
millimetro mi sembrava troppo spesso, ho usato un filo da 0,8 millimetri di
diametro e, di conseguenza, una punta di pari diametro per il dremel. È
importante fare un’osservazione: indipendentemente dal trapano che usiate,
bisogna che il foro sia al centro di tutte le parti, in questo modo non dovrete
preoccuparvi troppo di adattare i pezzi al momento di incollarli. Nel caso in
cui usiate un trapano manuale non avrete problemi, ma se usate un dremel
impostate una velocità non troppo elevata e non fate tutto il foro in una sola
volta, perché è probabile che la plastica si scaldi e si deformi. Avendo
tagliato dei perni di 1,5 centimetri di lunghezza, calcolate una profondità di
7,5 millimetri per ogni foro che fate: all’altezza dell’impugnatura, su entrambi
i lati dell’asta della lancia per allungare lo stendardo, alla base dell’asta
tagliata all’inizio, alla base della mazza ed in mezzo alla mano sinistra
(quest’ultimo non deve avere la stessa profondità degli altri).
A questo punto incollate tutti i vari
pezzi in posizione con la colla cianoacrilica per formare l’asta completa ed
armare il personaggio con la mazza.
Ora parliamo dell’insegna vera e
propria. Come ho detto prima, il personaggio originale ha l’insegna delle
guardie del tempio, che è doppia rispetto a quella dei sauri. Anche se ne avevo
una a disposizione, ho deciso di non usarla perché volevo caratterizzare
maggiormente il personaggio. La mia idea di stendardo da battaglia è che questo
deva rappresentare quanti più reggimenti possibile. Quindi, è per questo che ho
usato i due stendardi disponibili nello sprue dei sauri e li ho combinati come nell’insegna
delle guardie del tempio. In questo modo cerco di rappresentare quasi tutti i
reggimenti di fanteria: sauri lanceri, sauri guerrieri e guardie del tempio.
Come potete notare, ho eliminato qualsiasi elemento decorativo dalla parte
superiore di questi stendardi per formare una superficie piana che servirà in
seguito. Le piume che decoravano uno stendardo le ho riposizionate nella parte
inferiore, insieme ad altre decorazioni provenienti dagli sprue dei cavalieri
su naggaronte. Tutti gli elementi sono stati incollati tra loro con la colla
per plastica e, una volta asciutta, ho fissato questa prima insegna ai denti
sull’asta usando ancora la colla per plastica.
Per formare la parte superiore
dell’insegna ci è voluto molto più lavoro. Ho preso due stendardi ed ho
eliminato un paio di spire da ogni serpente. Con il coltello da modellismo ho
eliminato il sostegno per appenderlo allo stendardo di un cavaliere ed ho
scolpito un intaglio uguale agli altri già presenti. Una volta finito di fare
questo lavoro su entrambi i serpenti, ho praticato due fori su ogni stendardo,
uno all’altezza della seconda spira ed uno nella parte a contatto con il
proprio gemello. A questo punto, ho praticato gli ultimi due fori in
corrispondenza del “naso” dei serpenti dell’insegna verticale fissata all’asta
ed ho completato l’assemblaggio con i perni e la colla cianoacrilica.
Forse, dalla descrizione sembra
qualcosa di complicato, ma è più difficile da spiegare che da fare. Però, ci
sono alcuni consigli che sembrano scontati, ma è importante ripetere:
ü
Eliminate
le linee di fusione. Avere superfici lisce su cui dipingere andrà a vantaggio
della pittura, specie quando si applicherà la lavatura o si ricorrerà alla
tecnica del pennello asciutto;
ü
Usate
la colla giusta. Materiali diversi richiedono colle diverse. Come descritto
nell’articolo, le parti in plastica a contatto tra loro sono state incollate
con la colla per plastica, mentre i perni in metallo sono stati incollati alla
plastica con la colla cianoacrilica. So che sembra davvero banale, ma la colla
giusta crea un legame più resistente tra i pezzi;
ü
Andateci
piano con il dremel. Il trapano elettrico da modellismo è sicuramente uno
strumento che rende molto più veloce un lavoro noioso come fare i fori per i
perni, specie sulle miniature in metallo. Tuttavia, come con tutti i trapani
elettrici, la frizione tra la punta ed il materiale da forare genera calore.
Per questo è importante lavorare con una velocità non troppo elevata e fare
delle pause per permettere al materiale su cui state lavorando di raffreddarsi
un po’.
È tutto per ora. Ogni domanda,
suggerimento, od osservazione scriveteli nei commenti. Se vi è piaciuto
l’articolo, condividetelo e non dimenticate di lavorare su progetti sempre
nuovi MentreLaLavaturaAsciuga.
As
it frequently happens in this hobby, a model representing a hero is the result
of a more or less complex conversion. In this case, it is a relatively simple
conversion but I will write a couple of articles on much more complex, where
some elements have to be completely sculpted.
But,
where did I get the idea for this conversion? Basically, it came from accurate
observation and my lack of money, which is a common characteristic for many
hobbyists, unfortunately. I was looking at the images of the Lizardmen (now
Seraphon) Battle Standard Bearer and I noticed that two of the elements
composing the banner belong to two troops of this army: temple guards (now
Saurus Guards) and knights on naggaron (now Saurus Knights). Even though I
really like the BSB finecast model, I think that the problem is in the material
itself. I mean, resin is excellent for very detailed models, but it is not a
very robust material, so it is easy for thin or protruding elements to break. I
am talking about the decorations coming out from the banner and the stick
sustaining it. Maybe the whole structure could be more stable if we cut the
stick at the hand’s height in order to pin it with a quite long pin. Anyway, I
followed another path that brought me to the result you can see in the
pictures.
Let’s
start from the pieces I had: the body of a saurus, a standard bearer right arm,
a left arm, a club, the two standards of saurus warriors, two “twin” saurus
knights standards, the stick of a spear, the head of a saurus knight alpha and
a few decorations.
I
started by gluing the right leg, the arms and the head to the body using
plastic glue. Now it’s time for the real conversion. I cut the standard bearer
stick at the hand’s height and I separated the little chain from the shoulder.
I know it may be insignificant, but this single decoration that seems waved by
the wind gives me a strong idea of movement, as if the character was really
charging an opponent. Once the stick was cut, I started drilling the holes for
pins. Because the 1 millimetre seemed a bit too thick, I used 0,8 millimetre
wire and an equally thick dremel tip. It is important to notice that it doesn’t
matter the type of drill you use, but the hole has to in the centre of the
components, so you don’t have to worry too much about founding the way to fit
the pieces. In case you’re using a hand drill you won’t have problems, but if
you’re using an electric dremel, don’t drill hole all at once because the
plastic might heat up and deform. Since I cut 1,5 centimetre long pins, you
have to consider a 7,5 millimetre deep hole for every component you have to
drill: at the hand’s height, on both sides of the spare spear stick, at the
base of the standard bearer stick, at the base of the club and in the middle of
the left hand (this hole doesn’t have to be as deep as the others).
Now,
use cianoacrylic glue to form the complete stick and to arm the character with
the club.
Let’s
talk about the insignia. As I said before, the original character has the
temple guards’ banner, which is two-faced with respect to the saurus warriors’
one. Even if had had one saurus guard’s banner, I decided against using that banner
because I wanted the hero to be more characterised. My idea of battle standard
concerns the fact that it should represent as many regiments as possible within
one army. This is why I used the two different banners from saurus warriors’
sprues and I combined them to form the same pattern of the temple guards’
banner. In this way, I am trying to represent the majority of the infantry
regiments: saurus lancers, saurus warriors and temple guards. as you can see, I
smoothed every decoration on the upper part of the standards in order to create
a flat surface for the last step. The feathers that decorated the upper part
have been glued in the lower section with other decorative elements from the
saurus knights sprues. All the elements have been glued with plastic glue and,
once it was dry, I glued the first insignia to the stick using plastic glue
again.
Creating
the highest element of the standard took a while and much more work. I took the
banners and I cut a couple of coils from each one. Then, I used an exacto knife
to cut the support for gluing the banner to the knight’s stick and I carved an
incision like the other ones. Then, I drilled two holes for each banner, one on
the second coil and one in the middle of the part where the banner will touch
its “twin”.
At
this point, I drilled the last two holes on the vertical banner, one per each
snake’s “nose” and I completed the assembly with cianoacrylic glue.
From
this description, it might seem something complicated, but actually it’s harder
explaining than making it.
There
are just a few simple, but important tips that should be remembered:
ü Erase
mold lines. Working on flat surfaces is extremely convenient for your painting,
especially when you have to apply the wash or use the drybrush technique;
ü Use
the most suitable glue. Different materials require different types of glue. As
described in the article, plastic parts have been glued with plastic glue,
while metal pins have been glued to the plastic components with cianoacrylic
glue. I know that it seems almost silly, but the most suitable glue can create
the strongest bond;
ü Be
careful with dremel: electric hobby drills is a very useful piece of equipment
that makes boring jobs (such as drilling holes for pins) really faster,
especially with metal miniatures. However, as it happens with every electric
drill, the rubbing between the tip and the material to drill generates heat.
This is why it is extremely important working with a low speed and having
breaks in order to let the material cool down a little bit.
That’s all for now. Any question, suggestion or consideration,
please write them in the comments. If you liked the article, share it and don’t
forget to work always on new projects while the wash is drying (MentreLaLavaturaAsciuga)
在这个爱好里,体现英雄的微缩雕塑是变换工作的效果。在这里,变换工作比较简单,可是我要写和真复杂变换工作有关的一些文章。那两个变换的复杂性在于雕琢很多因素。
这个变换的主意是从哪里来?应该说这个变换的主意来自我的探查能力,以及来自我金钱的贫乏。可惜这是很多喜欢微缩雕塑者的共同特点。一天,看着蜥蜴人(现代的Seraphon)的旗带着,我发现了构成他旗的两个因素属于这个陆军的两种队,尤其是temple
guards (现代的Saurus Guards) 和knights on
naggaron (现代的Saurus Knights)。虽然我非常喜欢微旗带着的finecast微缩雕塑,问题在于那个微缩雕塑的资料。我的意思是虽然可以用finecast塑造真详细的微缩雕塑,可惜这个资料不太强壮,所以很容易损坏凸起的因素以及薄的因素。这个微缩雕塑的旗有很多凸起的装饰因素以及很薄的棍。可能,为了加强支持旗的棍可以把棍在英雄的手上剪,然后钻孔插进比较长的栓。但是,我找到的办法让我得到你们可以看的效果。
这是备有零碎的名单:一个Saurus Warrior身、一个旗带着的右臂、一个左臂。一个棒、两个不同的Saurus Warriors旗、两个同样的Saurus
Knights旗、一个矛的棍子、一个Saurus
Knights alpha的头和一些布置。
我开始用塑胶把右脚、两臂和头粘在身上。然后把旗的棍子在英雄的手上剪,把小链子从肩膀上分化出来。可能没有意思,但是这一个似乎是被风摇动的因素让我觉得微缩雕塑的运动,好像它打冲锋敌人。旗的棍子剪以后,我开始钻拴的孔。因为我觉得1个毫米直径的钢丝粗一点儿,我用了0,8毫米直径的钢丝以及一样粗的钻机尖。有一个很重要的意见:无论什么样的钻机,可是孔应该在每个零件的中间,这样粘贴的时候不要担心把零件对上。如果用手工的钻机没问题,但如果用电钻机(dremel)定不太高的速度,一点一滴地钻孔,否则塑料能先升温后走形。因为我砍了1,5厘米长的栓,应该钻7,5毫米深的孔在英雄的手上、矛棍子的上面和下面、带旗的棍子、棒子的下面和左手的中间(最后孔不如别的孔的深刻)。
到这里用强力胶把这些零件站在一起创造全部的带旗棍子,而把棒子粘在左手中。
现在可以说一说创作仪仗的过程。依据上述意见,独创的微缩雕塑有temple
guards的旗,这个旗比Saurus Warriors大一倍。虽然我有一个temple
guards的旗,我决定不用那个旗因为我的目的是显示这个陆军的特色。根据我战旗带的概念,那个旗应该代表全陆军队的大部,所以我用了Saurus
Warriors的两种旗组合temple guards的一样旗。这样我试图代表步兵队的大部: Saurus
Warriors枪手、Saurus Warriors和temple
guards。你们还可以看在旗的最高部分我用锉刀创作一个后来需要的平坦面积。布置旗的上面的羽毛哟用了布置下面,以及一些Saurus
Knights的装饰。
创作旗的最高部分比较复杂,需要一点儿时间。我用了两个同样的Saurus Knights旗,然后把一些蜷曲剪了。用锉刀我擦擦原来的支撑,然后我雕琢了一个和别的一样深刻的抠。到这里,在每个旗我钻孔,一个在第二蜷曲上,一个在旗触到自己“双子”的后边。
到这里,在总想蛇的“鼻子”上,我钻最后的两个孔,然后用强力胶完成了全旗的装配。
根据我的描述好像真复杂的过程,但这不是那么复杂的变化工作。
有一些应该提醒的建议:
ü
擦擦塑造线。涂料在平坦面积太重要了,尤其是涂水墨的时候或者使用干笔技术,
ü
用合适的胶。不同的质料需要不同的胶。意思是说为了粘贴塑性的料件要用塑胶,为了粘贴不同质料的料件要用强力胶。我知道这个建议很简单的,可是最适合的胶要创作最强黏合,
ü
仔细用dremel。微缩雕塑的电钻机很便捷的,使太腻的工作又更快又更容易(比如钻栓的孔),尤其是金的微缩雕塑。可是,摩擦生产热,所以很重要选择不太高的速度钻孔,然后歇一歇,让质料降温一下儿。
仅此而已。有问题、建议、评论、请你们在议论里写。如果你们喜欢这篇文章,请扩散,然后千万不忘掉水墨干燥的时候(MentreLaLavaturaAsciuga)一直创作心得工作。

Commenti
Posta un commento